Chest drain insertion is a clinician-performed procedure that places a catheter into the pleural space to remove air, blood, pus, or fluid and help the lung re-expand. Safe practice depends on patient assessment, the triangle of safety, ultrasound when appropriate, blunt dissection, secure fixation, and structured post-procedure monitoring.
This guide is for medical education and examination preparation, not a substitute for supervised training, local policy, or senior clinical support.
Key takeaways
- The triangle of safety is bounded by the lateral border of pectoralis major, the anterior border of latissimus dorsi and a line superior to the horizontal level of the nipple, with its apex below the axilla.
- Insert above the upper border of the rib: the neurovascular bundle runs in the groove beneath each rib.
- Use blunt dissection, not a trocar.
- Confirm the indication and the side against the imaging before you start, and keep the field sterile throughout.
- Two of the seventeen examined stations are procedural, and the technical one carries 12 of its 20 marks for skill.
When is a chest drain indicated?
Chest drain insertion is indicated when pleural air, blood, pus, or fluid must be removed to improve breathing, treat infection, control a complication, or support recovery after surgery.
Chest drain insertion is the placement of a tube into the pleural space to remove air, blood, pus, or fluid.
When is a chest drain required?
A chest drain may be required for:
- Pneumothorax, especially if tension develops, the patient is unstable, or the pneumothorax is large or symptomatic.
- Haemothorax, including traumatic bleeding into the pleural space.
- Pleural effusion causing significant breathlessness or respiratory compromise.
- Empyema, where infected pleural fluid requires drainage.
- Postoperative drainage after thoracic or cardiac surgery.
Tube thoracostomy is another term for placing an intercostal catheter into the pleural space. The terms thoracostomy, tube thoracostomy, and intercostal catheter may appear interchangeably in clinical guidelines, although equipment and technique vary by indication.
Inserting chest drains is not automatically required for every effusion or pneumothorax. A clinician should balance symptoms, imaging, stability, suspected cause, bleeding risk, and whether observation, needle aspiration, or specialist-led treatment is safer.
The decision depends on the patient’s symptoms, examination findings, imaging, and clinical stability. A small, stable pneumothorax may be suitable for observation or aspiration. A diagnostic or therapeutic aspiration may also be appropriate for selected pleural effusions. Discuss uncertain cases with a respiratory, surgical, or radiology specialist.
Initial assessment before drainage
Start with an ABCDE assessment. Assess respiratory rate, work of breathing, chest expansion, air entry, percussion, tracheal position, and signs of surgical emphysema. Record oxygen saturation and administer oxygen when clinically indicated.
Assess circulation with heart rate, blood pressure, capillary refill, mental state, and peripheral temperature. Look for shock, ongoing blood loss, or sepsis. Establish intravenous access and take blood tests when haemothorax, infection, or major illness is suspected.
Thoracic ultrasound can rapidly identify an effusion, pleural sliding, loculations, and a safe drain insertion site. Inserting chest drains without confirming anatomy can increase the risk of organ injury, particularly when the diaphragm is elevated or the pleural space is loculated.
Review relevant imaging. A chest X-ray may confirm a pneumothorax or haemothorax. For pleural effusions, ultrasound should identify the fluid, assess its depth, and mark a safe insertion site. Ultrasound is not usually required for pneumothax if imaging confirms a safe approach. - OSCE Guide)
An effusion is an abnormal collection of fluid in the pleural space, while an air-fluid level may indicate a combined pneumothorax and effusion. Ultrasound helps distinguish free-flowing fluid from loculated effusion and can guide a needle or intercostal catheter toward a safer pocket.
Safety checks and escalation
Explain the procedure, expected benefits, discomfort, and possible complications. Obtain consent where time allows. Check allergies, anticoagulant or antiplatelet treatment, clotting results, previous chest surgery, lung disease, and relevant comorbidities.
Contra-indications and relative contraindications should be actively considered before inserting a chest drain. They include an unsafe or unconfirmed site, uncorrected coagulopathy where treatment can safely wait, local infection, pleural adhesions, and inability to cooperate unless emergency treatment is essential.
Call for senior support if the patient is unstable, the anatomy is difficult, bleeding is suspected, or the diagnosis is uncertain. Tension pneumothorax with cardiovascular compromise requires immediate treatment and must not await delayed imaging.
According to the British Thoracic Society, image guidance is particularly important for pleural fluid procedures when the collection is small, posterior, loculated, or anatomically complex. Local NHS or hospital policy should determine who performs the procedure and which imaging pathway is required.
Safety insight: A correct indication and confirmed side are as important as technical skill. A perfectly performed thoracostomy on the wrong side remains a serious patient-safety event.
Urgent chest drain insertion is guided by clinical instability, respiratory compromise, or infected, bloody, or trapped pleural contents; stable cases may need observation, aspiration, imaging, or specialist advice instead.
What equipment and position do you need?
Safe chest drain insertion begins with the correct patient, side, indication, equipment, monitoring, and drainage system. Safe chest drain insertion begins with the correct patient, side, indication, equipment, and drainage system. Confirm imaging and review allergies, anticoagulation, respiratory status, and consent.
A formal time-out confirms the patient, procedure, side, indication, allergies, imaging, equipment, and anticipated drain size before starting.
Equipment and drain selection
A chest drain kit contains the sterile instruments and consumables required for controlled tube thoracostomy. A typical chest drain kit or drain kit may include a catheter, introducer needle, guidewire, dilator, scalpel, clamp, local anaesthetic supplies, suture, dressing, and connecting tubing.
Prepare sterile gloves, gown, mask, cap, antiseptic solution, sterile drapes, gauze, syringes, needles, and local anaesthetic. You also need a scalpel, blunt dissecting clamp, sutures, dressing, connecting tubing, and a closed drainage system.
For a needle- or guidewire-based technique, check the needle, guidewire, dilator, catheter, and three-way tap before beginning. The guidewire must remain controlled, and the dilator should never be advanced farther than necessary.
A chest drain is a tube that removes air, blood, pus, or fluid from the pleural space.
- Use a small-bore catheter, commonly 8–14 Fr, for many pneumothoraces and free-flowing pleural effusions.
- Select a larger 20–28 Fr tube when blood, thick pus, major air leaks, or traumatic haemothorax may obstruct smaller drains.
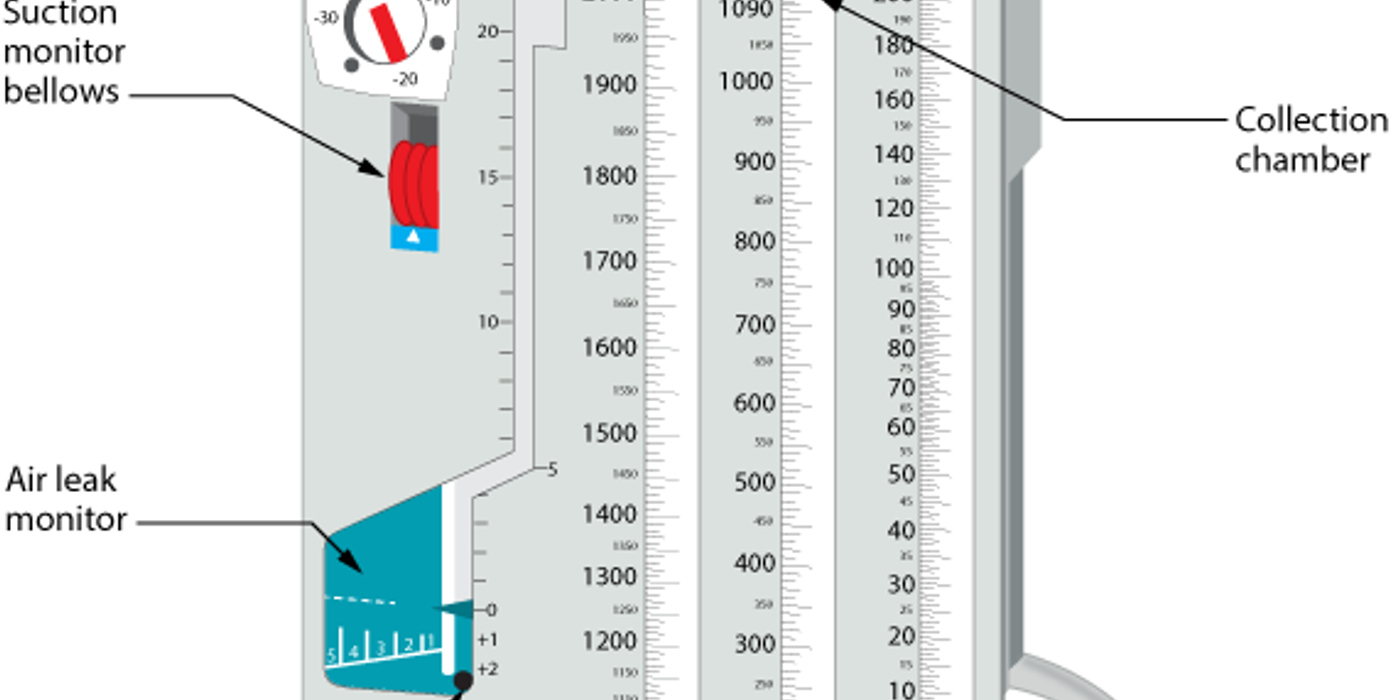
- Choose an underwater-seal system for ongoing drainage, and use suction only when prescribed and clinically indicated.
- Prepare ultrasound equipment for pleural fluid, ensuring a competent operator identifies a safe fluid pocket before insertion.
- Provide adequate analgesia, combining local anaesthetic infiltration with systemic analgesia or procedural sedation when clinically appropriate.
An underwater seal drain permits air and fluid to leave the pleural space while limiting reverse movement back into the patient. Keep the seal drain upright and below the insertion site, and inspect the chamber for expected movement, bubbling, and output.
The phrase inserting chest drain describes the procedural act, whereas insertion chest drain is a less natural search phrase sometimes used in revision materials. In either case, the safety principles are patient selection, imaging, sterile preparation, controlled entry, and reassessment.
Drain choice depends on the indication, fluid viscosity, expected air leak, and local policy. Small-bore drains may reduce discomfort, while larger tubes can resist blockage from clot or pus. Never select a tube solely by habit.
Position, monitoring, and sterile preparation
The safest patient position exposes the lateral thoracic wall while maintaining oxygenation, monitoring, and access to emergency equipment. Position the patient semi-upright or supine, with the ipsilateral arm elevated or placed behind the head. This exposes the lateral chest. Attach pulse oximetry, blood pressure monitoring, and cardiac monitoring where appropriate. Ensure oxygen, suction, resuscitation equipment, and help are immediately available.
Before inserting, establish a sterile field that is large enough for skin preparation, instruments, tubing, and the selected drain insertion site. A second sterile field may be useful when ultrasound guidance or a guidewire technique is required.
Wash hands with alcohol gel, or soap and water when visibly soiled. Wear suitable personal protective equipment and maintain aseptic technique throughout. Prepare the skin widely with antiseptic solution and allow it to dry. Mark the triangle of safety and insert above the rib’s upper border.
The triangle of safety is bounded by the lateral border of pectoralis major, the anterior border of latissimus dorsi and a line superior to the horizontal level of the nipple, with its apex below the axilla. The triangle safety concept is a practical landmark, not a guarantee of safety. Previous thoracic surgery, obesity, deformity, adhesions, a high diaphragm, and an unusual effusion can alter anatomy, so ultrasound or senior review may be necessary.
Explain each step clearly and reassess pain, oxygenation, and drainage after connection.
Prepare the patient, equipment, monitoring, and sterile field systematically before beginning chest drain insertion.
How do you insert a chest drain?
Tube thoracostomy is performed using local anaesthesia, a controlled incision, blunt tissue dissection, finger confirmation of pleural entry, and secure connection to a closed system.
The main risks during chest drain insertion are pleural organ injury, intercostal neurovascular damage, and drain malposition. Poor technique can also leave side holes outside the chest, causing air leakage or subcutaneous emphysema.
The solution is a controlled, blunt technique through the safe triangle. Prepare the patient, use adequate local anaesthetic, dissect above the rib, enter the pleural space with a finger, and advance the tube under direct tactile control.
The safe triangle reduces injury to major structures. It is bounded by the lateral border of pectoralis major, the anterior border of latissimus dorsi, and a horizontal line superior to the nipple. Its apex lies below the axilla. Insert just superior to the rib because the intercostal vein, artery, and nerve run mainly along the inferior rib border.
Inserting a chest drain should never involve forceful advancement. If resistance occurs, stop, reassess the incision, confirm the plane, and obtain senior assistance rather than advancing the needle, clamp, dilator, or catheter.
Preparation and pleural entry
- Confirm the indication, side, imaging, allergies, coagulation status, and consent. Perform a formal time-out. Position the patient semi-upright, with the arm on the affected side raised or placed behind the head.
- Apply monitoring and oxygen if clinically indicated. Prepare the skin widely with an appropriate antiseptic solution. Use sterile gown, gloves, drapes, gauze, and equipment.
- Infiltrate local anaesthetic through the skin, subcutaneous tissue, periosteum, intercostal muscles, and parietal pleura. Aspirate before injecting and allow time for the anaesthetic to work.
- Make a sufficiently large incision in the selected intercostal space. Place it just superior to the rib. The incision should allow the tube and clamp to pass without force.
- Use a curved clamp for blunt dissection. Spread the tissues in the direction of the fibres, staying above the rib. Do not use a trocar for blunt chest drain placement, because uncontrolled advancement can damage the lung, diaphragm, heart, or abdominal organs.
- Once the pleura is reached, open it carefully and perform a finger sweep. This confirms pleural entry, identifies adhesions, and helps exclude an interposed lung or organ. A finger sweep is a key safety step before advancing the tube.
During an open thoracostomy, the finger sweep confirms that the pleural space has been entered and that no solid organ lies immediately behind the incision. This step is distinct from using a needle to aspirate air or fluid.
If a guidewire technique is selected, the needle should aspirate the expected material before the guidewire is passed. Keep the guidewire visible and controlled, use the dilator only to enlarge the tract, and never lose access to the wire.
Tube advancement and connection
- Direct the tube into the pleural cavity according to the clinical indication. For pneumothorax, aim apically where possible. For fluid, direct it posteriorly and basally. Advance gently; never force the tube.
- Ensure every side hole lies within the pleural space. The final drainage hole must be well inside the chest wall. Some procedural guides describe advancing approximately 5–10 cm, but depth depends on the patient and tube design - OSCE Guide).
- Remove any guidewire before connecting the drain. Hold the tube securely during connection. Attach it to sterile tubing and an underwater seal drainage system. Keep the bottle upright and below chest level.
- Check for swinging, bubbling, or drainage as clinically appropriate. Do not clamp a functioning drain routinely. Confirm that all connections are tight and that the system remains closed.
When inserting, verify that the catheter is not kinked and that its fenestrations remain intrapleural. A drain can appear connected while failing to drain air or fluid if a side hole is positioned in the soft tissues.
A three-way tap may assist aspiration or sampling in selected systems, but it must be labelled and handled carefully. Incorrect tap positioning can obstruct flow, disconnect the system, or expose the patient to atmospheric air.
Fixation and immediate documentation
Secure fixation prevents migration, accidental removal, and loss of the seal after tube insertion. Secure the tube with an appropriate holding suture. Apply a sterile occlusive dressing and reinforce the connection with tape if required. Label the dressing with the side, date, time, tube size, and insertion depth.
A stay stitch supports the catheter at the skin, while a purse string suture can assist closure after removal. Follow local policy for suture material and technique; the string suture should not be placed so tightly that it causes tissue injury.
Document the indication, consent, site, anaesthetic, technique, tube type and size, depth, drainage findings, complications, and patient tolerance. Arrange appropriate post-procedure assessment and imaging according to local policy.
What is the most tested anatomical safety point? Insert just superior to the rib. This reduces the risk of injuring the intercostal neurovascular bundle. What is the key tube-position check? Confirm that the last side hole is inside the pleural space before connection and fixation.
Safe chest drain insertion requires the triangle of safety, blunt dissection above the rib, controlled tube advancement, and secure underwater-seal connection.
Technical insight: A guidewire, dilator, needle, and three-way tap require continuous control. If any component is not clearly identified, stop the procedure and re-establish the equipment sequence.
How Do You Check Drain Function and Position?
After chest tube insertion, assess the patient first, then inspect the catheter, connections, seal drain, insertion site, and imaging. After chest drain insertion, reassess the patient first, then inspect the tube, connections, and drainage system. Confirm position and lung re-expansion with post-procedure chest imaging, usually within a few hours.
Immediate clinical and system checks
Reassess respiratory rate, oxygen saturation, work of breathing, chest pain, breath sounds, and haemodynamic status. Compare these findings with the patient’s pre-procedure condition. Deterioration may indicate tension pneumothorax, bleeding, organ injury, or a non-functioning drain.
The first function check asks whether the system can drain air or fluid and whether the patient is clinically improving. Compare observations before and after the procedure, and escalate any deterioration rather than relying on the apparatus alone.
Inspect the chest drain site and dressing for bleeding, swelling, or surgical emphysema. Check that the tube is secured and that all connections are tight. The tube should follow a smooth path without kinks, dependent loops, compression, or accidental withdrawal.
Record the volume and character of drainage. Fluid drainage may be expected with a pleural effusion, haemothorax, or empyema. Sudden heavy blood loss, rapidly increasing output, or persistent large-volume drainage requires urgent senior review.
In an underwater-seal system, swinging means fluid movement caused by changes in pleural pressure during breathing. Swinging commonly suggests tube patency. Reduced or absent movement may occur after lung re-expansion, but also with kinking, blockage, disconnection, or malposition.
In a pneumothorax, bubbling may show that the system is allowing air to leave the pleural space. However, bubbling can also arise from loose connectors, a damaged bottle, or the drain insertion site, so inspect the entire pathway.
Bubbling during coughing or expiration can indicate air leaving the pleural space. Continuous bubbling may indicate an ongoing air leak, a loose connection, or a problem at the insertion site. Check the patient and the complete system before attributing bubbling to the pleural space.
Excessive bubbling suggests a significant air leak. Sudden absence of bubbling or swinging in a previously active system may indicate blockage or disconnection. Do not routinely clamp a drain to investigate an air leak, because this can precipitate tension pneumothorax.
Imaging and tube position
Post-procedure imaging confirms whether the drain is correctly positioned and whether the lung has re-expanded. Request post-procedure chest imaging, generally within a few hours of insertion. A chest radiograph should assess the tube’s intrathoracic position, lung re-expansion, residual pleural air or fluid, and complications such as pneumothorax.
Ultrasound can be useful at the bedside when recurrent effusion, loculation, or a change in symptoms makes a plain radiograph insufficient. A CT scan may be required for complex malposition, mediastinal placement, diaphragmatic injury, or persistent unexplained symptoms.
Check that all side holes lie within the pleural cavity. A subcutaneous side hole can allow air into the tissues rather than drain the chest. Look for subcutaneous placement, malposition, kinking, migration, or accidental withdrawal. If position or function remains uncertain, obtain further radiographs or chest CT.
A functioning chest drain produces appropriate drainage or air evacuation, while the patient improves and imaging confirms a safe intrapleural position.
How is the drain managed afterwards, and what complications occur?
Ongoing chest drain management combines clinical observation, system inspection, output measurement, pain control, and prompt escalation when findings change.
What ongoing care does the chest drain require?
Chest drain management means monitoring the patient, tube, drainage system, and chest site as one system. Record respiratory rate, oxygen saturation, heart rate, blood pressure, temperature, pain, and work of breathing. Reassess the chest clinically after insertion and after any sudden change.
Provide regular analgesia so the patient can breathe deeply and cough. Encourage respiratory physiotherapy, supported coughing, and mobilisation where safe. Document fluid intake, urine output, drain output, and the character of drainage. Record observations at least hourly in an unstable patient.
Check that the chest tube remains secured, unkinked, and below the chest level. Keep the drainage bottle upright. Confirm that the connections are tight and that the water seal fluctuates with breathing. Bubbling may indicate an air leak, especially during expiration or coughing.
Nurses and clinicians should document whether the seal drain is swinging, bubbling, connected, upright, and below the insertion site. This creates a time-based record that helps identify blockage, disconnection, migration, or a new leak.
Measure output hourly at first, then according to local policy. Record the volume, colour, and rate of drainage. Sudden fresh blood, rapid output, or a sudden stop requires urgent review. Never routinely clamp a chest drain, because this can cause tension pneumothorax.
Why and when is suction used?
Suction may support lung re-expansion when prescribed, but it is not routinely required for every patient or every drain. Suction may help maintain lung expansion when a pneumothorax persists or drainage is inadequate. Use it only after senior or specialist review. The British Thoracic Society recommends a high-volume, low-pressure system at −10 to −10 to −20 cmH2O where suction is used.
Before applying suction, confirm the indication, prescribed pressure, tubing, water seal, and patient response. Excessive negative pressure can increase an air leak or contribute to re-expansion pulmonary oedema.
Inappropriate suction can worsen an air leak, draw tissue into a tube, or contribute to re-expansion pulmonary oedema. Confirm the prescribed pressure and check the suction control chamber. A wet suction system is commonly filled to the −10 to −20 cmH2O mark.
How should complications be recognised?
Complications require immediate patient assessment, system inspection, senior escalation, and targeted imaging or intervention. Escalate immediately for increasing breathlessness, hypoxia, shock, severe chest pain, or new surgical emphysema. Consider:
- Bleeding: falling blood pressure, tachycardia, or rapidly bloody drainage. Seek senior and surgical review.
- Infection: fever, spreading redness, purulent drainage, or worsening pleural sepsis.
- Persistent air leak: continuous bubbling or a pneumothorax that fails to resolve. Check for loose connections and seek specialist advice.
- Re-expansion pulmonary oedema: worsening breathlessness, crackles, and hypoxia after rapid drainage.
- Organ injury: abdominal pain, neurological signs, or unexplained deterioration may indicate diaphragmatic, lung, or vascular injury.
- Blockage or dislodgement: absent drainage, kinking, migration, or a tube outside the chest. Do not push a displaced tube back in.
A retained catheter, mediastinal placement, or a drain that enters an abdominal organ is a procedural emergency. Stop manipulating the device, assess the patient, notify a senior clinician, and arrange urgent imaging and specialist management.
Obtain chest imaging or bedside ultrasound after insertion and when the clinical picture changes.
Removal is considered when the original problem has resolved, output is acceptable, the patient is stable, and there is no clinically significant ongoing air leak.
Remove the tube when the original indication has resolved, the patient is clinically improved, and drainage is acceptable. Common practice requires minimal serous output, often below 100–200 mL over 24 hours, although local protocols differ.
For pneumothorax, assess for a sustained absence of air leak. Confirm bubbling has stopped during observation, coughing, and mobilisation. Removal should follow senior review, appropriate imaging, analgesia, and an occlusive dressing.
Safe removal requires clinical improvement, resolved pathology, acceptable drainage, and a properly assessed air leak. This chest drain insertion management checklist summarises the essential ongoing checks described in this section, including patient observations, analgesia, respiratory care, drain positioning, chest-site review, fluid balance, and output documentation.
What does the examiner want at the chest drain station?
An MRCS Part B chest drain station tests whether the candidate can explain the procedure, identify anatomy, maintain sterility, perform safe tube insertion, and manage complications.
A chest drain station is a structured test of communication, clinical knowledge, technical skill, and patient safety.
A reliable station structure
Use the same sequence every time:
- Introduce yourself, confirm the patient’s identity, and check allergies.
- Explain the indication, procedure, discomfort, risks, and alternatives.
- Gain consent, offer analgesia, and request monitoring and assistance.
- Check the equipment, drainage system, local anaesthetic, and sharps bin.
- Position the patient safely, expose the chest, and identify the triangle of safety.
- Use hand hygiene, gown, gloves, antiseptic preparation, and sterile drapes.
- Infiltrate local anaesthetic to the skin, periosteum, and pleura.
- Make the incision above the rib and use blunt dissection, not a trocar.
- Explore the pleural space with a finger for adhesions before advancing the tube.
- Direct the tube appropriately, secure it with sutures, and connect it to closed drainage.
- Apply a sterile dressing, reassess the patient, and arrange imaging or review.
- Document consent, site, tube size, anaesthetic, drainage, complications, and aftercare.
Before inserting, verbalise that the needle, incision, blunt dissection, finger sweep, and tube advancement will remain controlled and above the rib. This demonstrates both anatomical knowledge and risk awareness.
The triangle of safety is bounded by the lateral border of pectoralis major, the anterior border of latissimus dorsi, and a line above nipple level. Its apex lies below the axilla. Insert above the rib’s upper border to avoid the intercostal neurovascular bundle.
High-yield marking points and errors
High-scoring candidates describe what they are doing, why they are doing it, and how they would respond if the patient deteriorates. A patient-based procedural station is marked out of 20: 8 marks assess clinical and technical skill, with 4 marks each for knowledge, communication, and professionalism. A model-based station awards 12 marks for skill and 8 for knowledge.
Examiners commonly look for clear anatomy, sterile technique, adequate local anaesthetic, safe tube direction, secure fixation, and correct connection to the drainage system. State how you would recognise and manage bleeding, infection, organ injury, tube blockage, malposition, or worsening respiratory distress.
Symptoms of common failures include choosing a site below the safe triangle, passing the tube incorrectly, using excessive force, omitting finger exploration, failing to secure the tube, or forgetting post-procedure observations and imaging.
Practise this station with Mrcspartbquestions surgical skills scenarios, mark schemes, explanations, and progress tracking across desktop, tablet, and mobile devices. The platform includes more than 3,500 MRCS Part B questions and interactive revision resources. Hands-on learning is also used in nursing procedural education, including HoloLens2 for Nursing: ‘Hands-on’ learning during pandemic and beyond.
A safe chest drain performance follows a consistent sequence: communicate, identify anatomy, maintain sterility, secure the tube, connect drainage, and check the patient afterwards.
How is this topic marked in MRCS Part B?
MRCS Part B marks the procedural stations out of 20. Procedural skills with a patient carries 8 marks for clinical and technical skill and 4 each for clinical knowledge, communication and professionalism. Procedural skills (technical), performed on a model, carries 12 marks for skill and 8 for knowledge, with no communication or professionalism marks. Two of the seventeen examined stations are procedural.